Gauge Wire for Starter Button => The recommended gauge wire for a starter button is typically 12 or 14 gauge. This size wire is suitable for providing the necessary power to the starter button and ensuring proper functionality.
Choosing the correct wire gauge for a starter button is crucial for the proper functioning of the electrical system. The gauge of the wire determines its diameter and current-carrying capacity. Using a wire that is too small may result in insufficient power transmission, leading to issues with starting the engine.
On the other hand, using a wire that is too large may be unnecessary and may cause difficulties with installation. To ensure optimal performance, it is important to select the appropriate wire gauge for the starter button. We will discuss the recommended gauge wire for a starter button and its importance in maintaining a properly functioning vehicle.
Understanding The Importance Of Wire Gauge
Understanding the importance of a wire gauge is crucial when wiring a starter button. Choosing the right gauge wire ensures proper electrical connectivity and prevents any potential damage or electrical accidents. Selecting the appropriate gauge wire for a starter button is essential for optimal functionality and safety.
The wire gauge you choose for your starter button is crucial for ensuring the smooth and efficient operation of your vehicle. The wire gauge refers to the thickness or diameter of the wire, and it plays a critical role in determining the amount of current that can safely pass through it.
Using the right gauge wire is essential to prevent overheating, voltage drops, and potential damage to your starter system. Here’s why understanding wire gauge is important:
- Proper current flow: The wire gauge determines how much current can pass through it without overheating. If you use a wire with a gauge that’s too thin, it may not be able to handle the current required by your starter button, leading to overheating and potential wire failure. On the other hand, if you use a wire with a gauge that’s too thick, it may cause unnecessary resistance and voltage drops.
- Voltage drop prevention: Voltage drop occurs when the wire’s resistance causes a decrease in the voltage reaching your starter button. This can result in a weak or slow-starting system, affecting your vehicle’s performance. By using the appropriate wire gauge, you can minimize voltage drops and ensure sufficient power for your starter button to function optimally.
- Avoiding wire damage: When the wire gauge is not suitable for the current load, the wire can get damaged due to excessive heat buildup. This can lead to wire melting, insulation damage, and potentially even a short circuit. Using the right wire gauge helps protect your vehicle’s wiring system and prevents costly repairs down the line.
Choosing the correct wire gauge is crucial for the optimal functioning and longevity of your starter button. It ensures proper current flow, prevents voltage drops, and avoids potential wire damage. Now, let’s explore what wire gauge is appropriate for a starter button.
Factors To Consider For Wire Gauge Selection
When choosing the wire gauge for a starter button, it is important to consider the voltage, current, and distance requirements. Factors such as the type of vehicle and the power lead color should also be taken into account to ensure proper wiring.
Gauge Wire for Starter Button
When it comes to selecting the appropriate wire gauge for a starter button, there are several key factors to consider. The wire gauge determines the thickness and capacity of the wire, which is crucial for ensuring the starter button functions properly and safely.
Here are three important factors to keep in mind when selecting the wire gauge for your starter button:
- Current requirements of the starter button:
- Determine the maximum current that the starter button will draw. This information can often be found in the starter button’s specifications or user manual.
- Use this current rating as a reference point when choosing an appropriate wire gauge. The wire gauge should be able to handle the maximum current without overheating or causing any voltage drops.
- Remember that using a wire gauge that is too small can result in excessive heat buildup and potential damage to the wire, while a wire gauge that is too large may be unnecessary and bulky.
- Length of wire run:
- Consider the distance between the starter button and the power source (such as the battery or ignition switch).
- Longer wire runs require thicker wire gauges to minimize voltage drop and ensure sufficient power reaches the starter button.
- Use a wire gauge chart or calculator to determine the appropriate wire gauge based on the distance of the wire run. The chart will typically provide recommendations based on both the current requirements and the wire run length.
- Voltage drop considerations:
- Voltage drop refers to the decrease in voltage that occurs as current flows through a wire. It can affect the performance of the starter button and other electrical components.
- Calculate the voltage drop based on the current requirements and the resistance of the wire.
- Choose a wire gauge that minimizes voltage drop. Thicker wire gauges have lower resistance and are therefore better suited for longer wire runs or applications with high current requirements.
By considering the current requirements, length of wire run, and voltage drop considerations, you can select the most suitable wire gauge for your starter button. Remember to refer to wire gauge charts or calculators for precise recommendations based on your specific needs.
Common Wire Gauges Used For Starter Buttons
Common wire gauges used for starter buttons range from 12-14 gauge. The gauge of wire needed for a starter button depends on the specific requirements of the starter and the electrical system of the vehicle. It is important to choose the appropriate wire gauge to ensure proper functioning and safety.
Gauge Wire for Starter Button
Starter buttons are an essential component of any electrical system, allowing users to conveniently start and stop their devices with the push of a button. But have you ever wondered what gauge wire is suitable for connecting a starter button?
In this section, we will explore the common wire gauges used for starter buttons, ensuring that you have the right information to make an informed decision. Let’s dive in!
Overview Of Common Wire Gauges:
- 14 Gauge:
- This is a common wire gauge used for low-power applications such as automotive starter buttons. It is suitable for circuits with a maximum current rating of around 15 amps.
- 12 Gauge:
- A slightly thicker wire gauge, 12 gauge is suitable for applications that require a higher current rating. It is often used for starter buttons that operate devices with a higher power requirement.
- 10 Gauge:
- If you need to handle even higher current loads, the 10 gauge wire is a good choice. It can handle currents up to 30 amps and is commonly used in heavy-duty starter button applications.
- 8 Gauge:
- For heavy-duty applications that require even higher currents, the 8 gauge wire is recommended. It can handle currents up to 50 amps, making it suitable for demanding starter button setups.
- 6 Gauge:
- The 6 gauge wire is the thickest wire gauge commonly used for starter buttons. It is suitable for applications that require extremely high current handling capacity, such as starter buttons for large industrial equipment.
Recommended Wire Gauges For Starter Buttons:
- Low Power Applications:
- For starter buttons that operate low-power devices, such as small machinery or automotive applications, a 14 gauge wire is recommended. It provides sufficient current carrying capacity while being cost-effective.
- Medium Power Applications:
- If you are dealing with medium-power devices, such as marine equipment or recreational vehicles, a 12 gauge wire is a suitable choice. It offers a higher current rating and ensures a reliable connection.
- High Power Applications:
- For heavy-duty applications that require a substantial current flow, such as industrial equipment or large machinery, an 8 or 6-gauge wire is recommended. These wire gauges can handle high currents without overheating or voltage drop.
Remember, when selecting the appropriate wire gauge for your starter button, it’s important to consider the maximum current flow of your device and the length of the wire run. Using an undersized wire can lead to voltage drop and overheating while using an oversized wire may not offer any practical advantage and can be costly.
Always consult the manufacturer’s recommendations and follow electrical safety guidelines when working with starter buttons and wiring. Gauge Wire for Starter Button
Benefits Of Using The Correct Wire Gauge
Using the correct wire gauge for a starter button offers several benefits, including optimal electrical performance and preventing overheating or damage to the wiring system. It ensures a reliable connection, reduces the risk of voltage drop, and improves the overall functionality of the starter button.
Gauge Wire for Starter Button
Using the correct wire gauge for your starter button can provide several benefits. Here are some key advantages to consider:
- Avoiding voltage drop issues: When the wire gauge is not appropriate, there can be a significant voltage drop between the starter button and the starter motor. This can lead to slow or inconsistent starting, and even failure to start altogether. By using the correct wire gauge, you can ensure that the voltage remains stable and that the starter motor receives the power it needs to function properly.
- Ensuring proper current flow: Using the correct wire gauge allows for the proper flow of current from the battery to the starter motor. This ensures that the starter motor receives the necessary current to engage and start the engine smoothly. Without the proper wire gauge, there may be insufficient current flow, resulting in a sluggish or ineffective starting process.
- Minimizing electrical resistance: Using the correct wire gauge helps minimize electrical resistance in the circuit. Electrical resistance can hinder the flow of current, leading to power loss and inefficient system performance. By choosing the appropriate gauge, you can minimize resistance and optimize the efficiency of your starter button.
Using the correct wire gauge for your starter button is essential for avoiding voltage drop issues, ensuring proper current flow, and minimizing electrical resistance. These benefits lead to a more reliable and efficient starting process for your vehicle. Remember to consult the manufacturer’s specifications or seek professional advice to determine the appropriate wire gauge for your specific application.
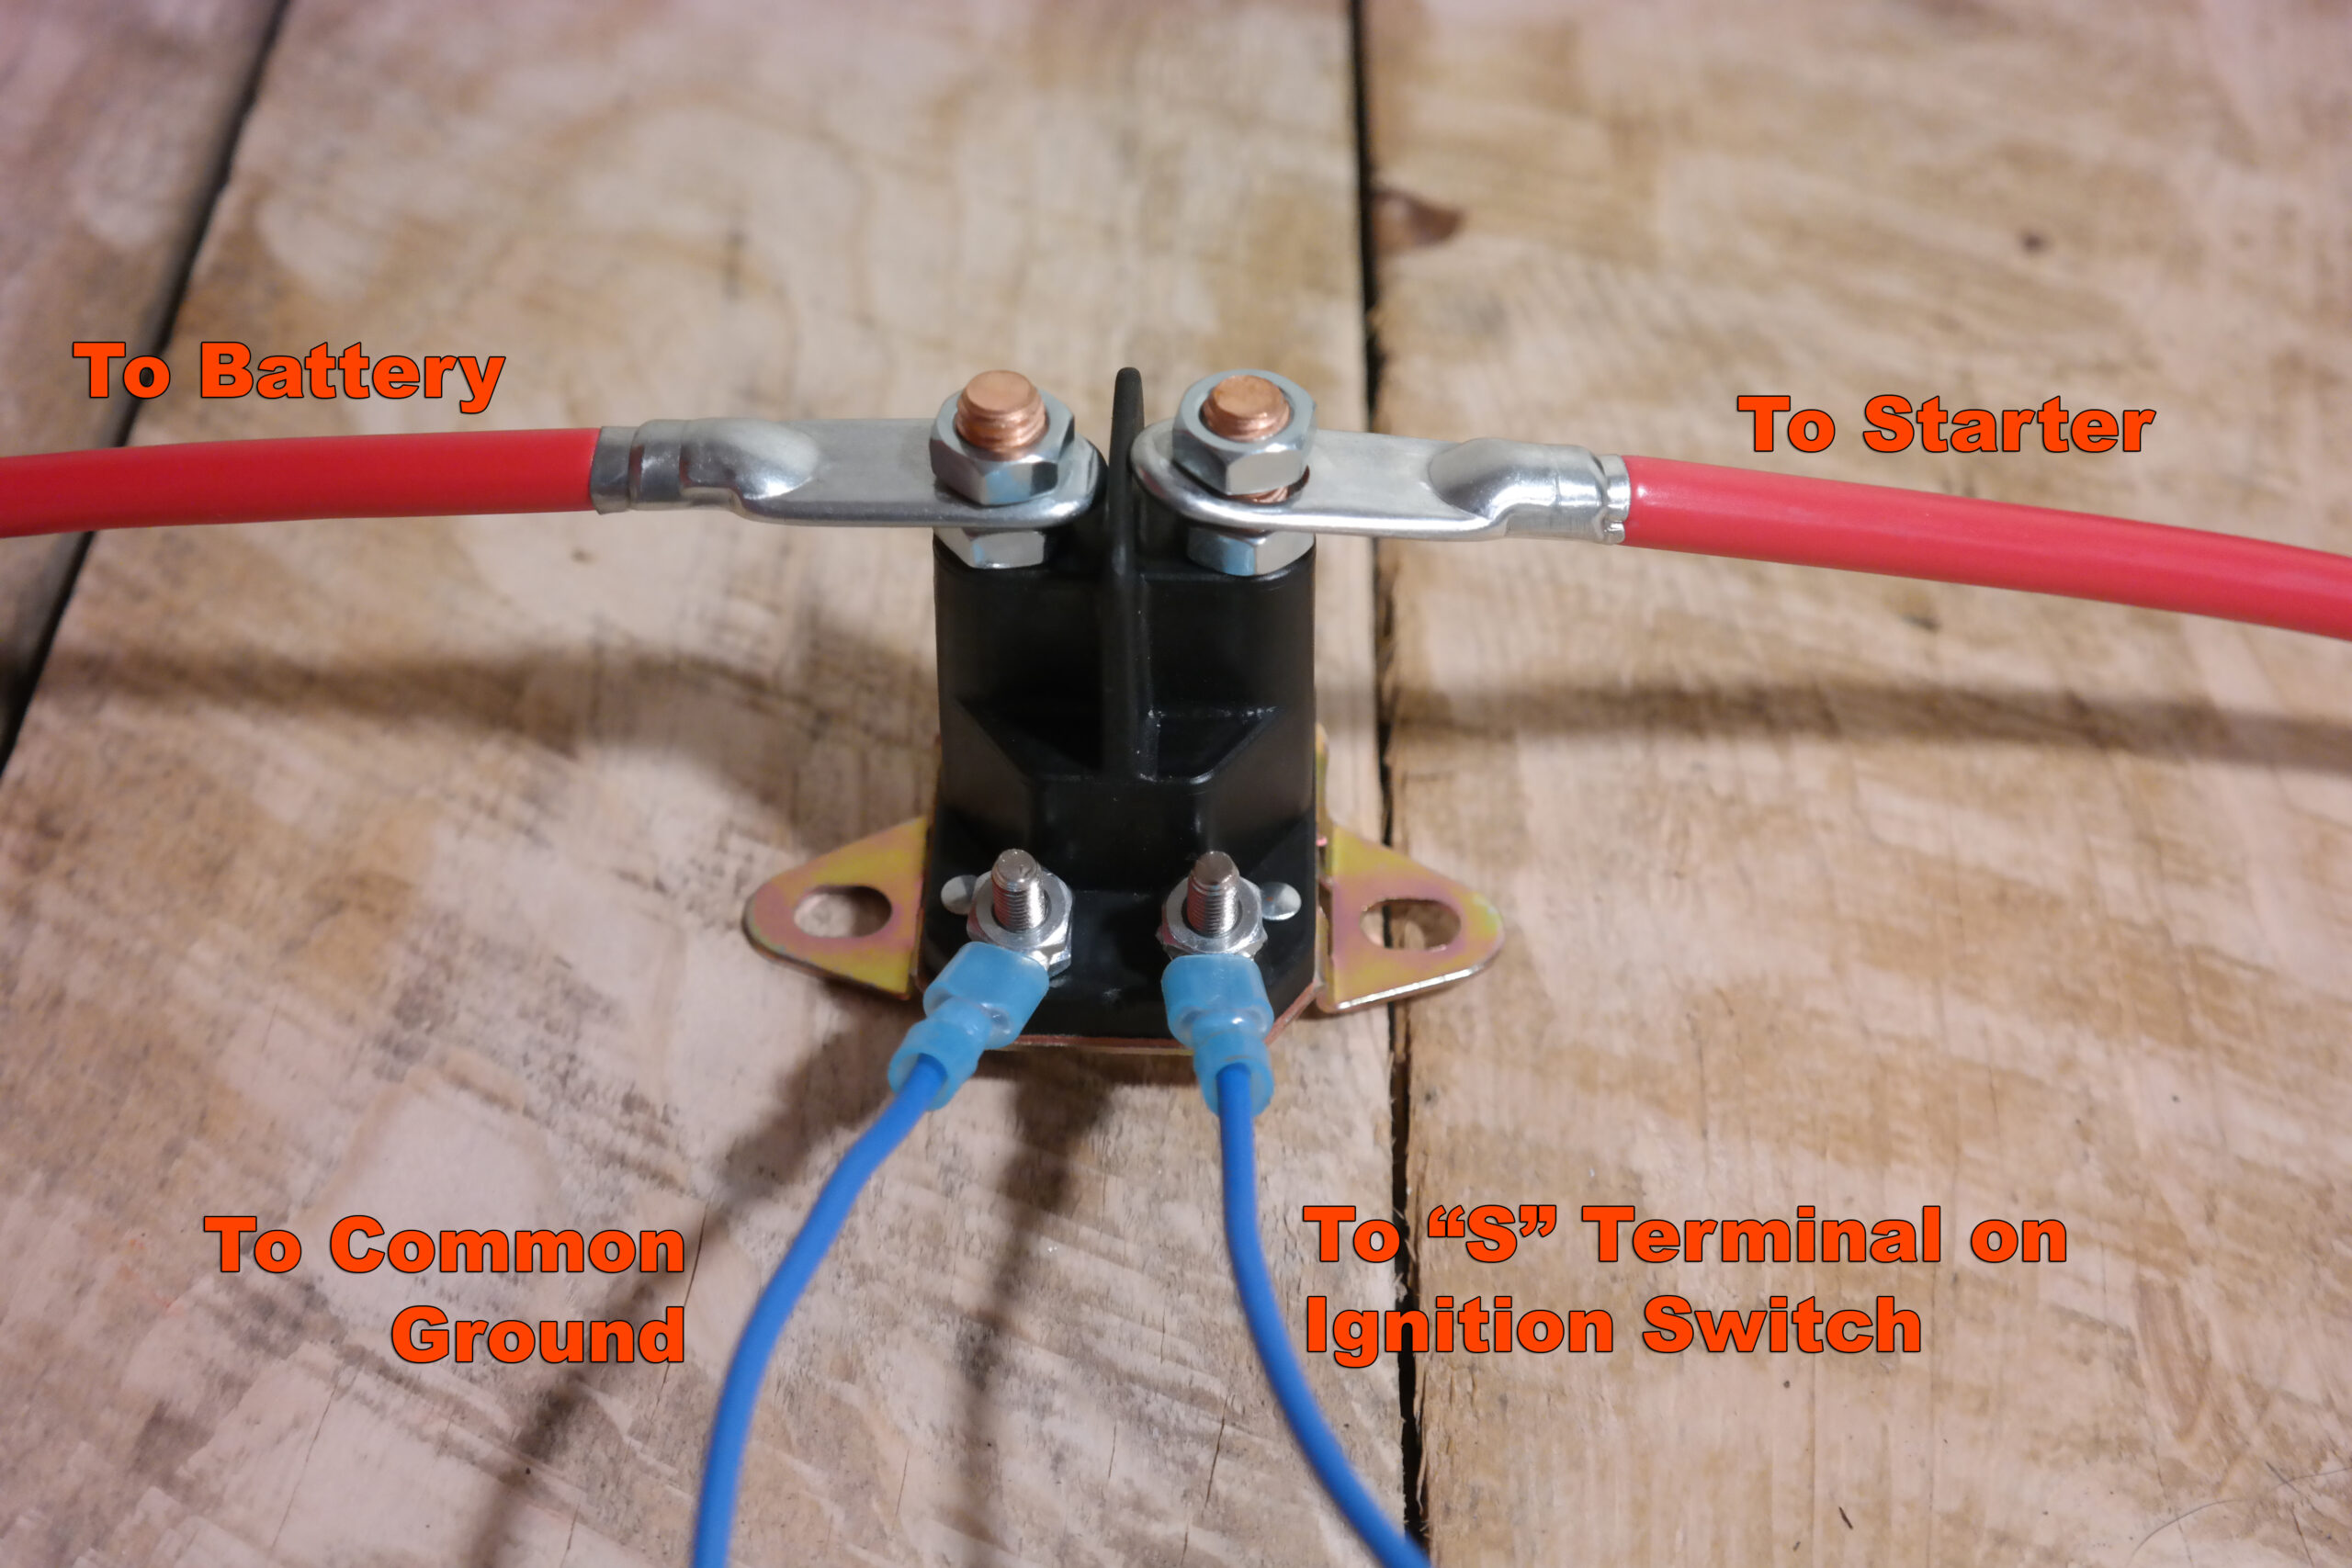
Step-By-Step Guide: Wiring A Starter Button
Wiring a starter button requires a gauge wire with a thickness of 12-14 ga. Follow the step-by-step guide to ensure a successful installation.
Step 1: Gather The Necessary Tools And Materials
To wire a starter button, you’ll need the following tools and materials:
- Wire cutter/stripper
- Crimping tool
- Starter button
- Appropriate gauge wire
- Electrical tape or heat shrink tubing
- Ring terminals or spade connectors
- Wire connectors
Step 2: Determine The Appropriate Wire Gauge
The wire gauge you need for your starter button will depend on the electrical load it will carry. Consider the following factors when determining the wire gauge:
- Current draw of the starter button
- Length of wire from the button to the starter
- Voltage of the system
Step 3: Measure And Cut The Wire
Measure the distance from the starter button to the starter and cut the wire to the appropriate length. Be sure to leave some extra length for maneuverability and ease of installation.
Step 4: Connect The Wire To The Starter Button
Follow these steps to connect the wire to the starter button:
- Strip the insulation off the ends of the wire.
- Attach a ring terminal or spade connector to one end of the wire.
- Insert the wire into the appropriate terminal on the starter button.
- Use a crimping tool to secure the connection.
- Repeat the process for the other end of the wire if necessary.
Step 5: Secure The Connection And Test The Button
To ensure a secure connection and functionality, follow these steps:
- Use electrical tape or heat shrink tubing to cover the exposed wire and connectors.
- Double-check that all connections are secure and tight.
- Test the button by pressing it to start the engine or activate the desired function.
- If the button works correctly, secure the wire along the existing wiring harness using zip ties or adhesive clips.
By following these steps, you can properly wire a starter button in your vehicle or other applications. Remember to prioritize safety and consult professional assistance if needed.
Common Mistakes To Avoid | Gauge Wire for Starter Button
When wiring a starter button, it is important to choose the correct gauge wire for optimal performance. Avoid common mistakes by using a 12-14 gauge wire for the starter solenoid and ensuring proper connections to the ignition switch. Be sure to follow these steps for a successful installation.
Incorrect Wire Gauge Selection:
- Using the wrong wire gauge for your starter button can lead to various issues, such as overheating, voltage drops, and even damage to the electrical components.
- It is important to choose the correct wire gauge based on the amperage requirements of your starter button. Using a wire gauge that is too small can result in resistance and inadequate power flow.
- Here are the common mistakes to avoid when selecting a wire gauge for a starter button:
- Using too small of a wire gauge: Using a wire gauge that is too small can lead to a voltage drop and cause the starter button to malfunction. It is essential to check the recommended wire gauge for your starter button and choose the appropriate size.
- Neglecting the amperage rating: Each starter button has an amperage rating that indicates its power requirements. Ignoring this rating and using a wire gauge that cannot handle the required amperage can lead to overheating and potential failure.
- Failing to consider the distance: The length of the wire between the starter button and the power source should also be taken into account when choosing the wire gauge. Longer distances require thicker wire gauges to prevent voltage drop.
- Underestimating future upgrades: If you plan to add more electrical components or accessories that may draw extra power in the future, it is advisable to select a wire gauge that can handle the anticipated amperage.
Poor Wire Connections:
- Poor wire connections can cause a range of problems, including intermittent functionality, electrical shorts, and potential hazards. Taking the time to ensure proper wire connections is crucial for the smooth operation of your starter button.
- Here are some common mistakes to avoid when making wire connections for a starter button:
- Inadequate insulation removal: When connecting wires, it is vital to strip the insulation carefully to expose the necessary length of bare wire. Failing to remove the insulation correctly can result in weak connections and unreliable performance.
- Using the wrong connectors: Using improper connectors, such as mismatched sizes or types, can lead to loose connections and potential electrical hazards. Always use connectors that are designed for the wire gauge and type you are working with.
- Poor crimping techniques: When using crimp connectors, it is important to ensure a secure and proper crimp. Insufficient crimping can lead to loose connections and increased resistance, affecting the overall performance of the starter button.
- Lack of protection: After making wire connections, it is crucial to protect them from external elements, such as moisture, heat, and vibrations. Use appropriate wire sheathing, tape, or zip ties to secure and shield the connections.
Inadequate Wire Protection:
- Proper wire protection is essential to ensure the longevity and safety of the electrical system connected to your starter button. Neglecting to provide adequate wire protection can result in damage, short circuits, and potential mishaps.
- Here are some common mistakes to avoid regarding wire protection for a starter button:
- Exposed wires: Leaving wires exposed increases the risk of accidental contact, which can lead to shorts or electrical shocks. Always cover exposed wires with appropriate insulation or sheathing.
- Insufficient wire routing: Proper wire routing prevents wires from being pinched, crushed, or damaged by moving parts or sharp edges. Ensure that wires are securely fastened and guided away from potential hazards.
- Lack of protective barriers: In environments where wires may be exposed to moisture, heat, or other detrimental factors, it is essential to provide additional protection. Utilize waterproof connectors, heat shrink tubing, or conduit to safeguard the wires.
- Ignoring proper grounding: A proper grounding connection is crucial to ensure safe and reliable operation. Neglecting to establish a solid ground connection can result in electrical issues and potential damage to the starter button.
Remember, selecting the correct wire gauge, ensuring proper wire connections, and providing adequate wire protection are critical steps to ensure the effective and safe functioning of your starter button. By avoiding these common mistakes, you can enjoy a hassle-free and dependable electrical system.
Troubleshooting Starter Button Wiring Issues
For troubleshooting starter button wiring issues, it is recommended to use a 12-14 gauge wire for the starter button. Using the correct gauge wire ensures proper functionality and prevents any potential wiring mistakes.
Gauge Wire for Starter Button
When it comes to troubleshooting starter button wiring issues, there are a few common problems that you may encounter. Understanding these issues and knowing how to fix them can save you time and frustration. Here are some important points to consider:
- Loose connections: One of the most common problems with starter button wiring is loose connections. Over time, the wires connecting the starter button to the ignition system can become loose or disconnected, preventing the button from functioning properly.
- Faulty wiring: Another issue that can occur is faulty wiring. This could be due to damaged or worn-out wires, which can lead to inconsistent connections or no connection at all. It’s important to inspect the wiring for any signs of damage and ensure that all wires are securely connected.
- Incorrect gauge wire: Using the wrong gauge wire for your starter button can also cause problems. If the wire is too thin, it may not be able to handle the current required to power the starter motor. On the other hand, using a wire that is too thick can make it difficult to properly secure the connections. It’s important to use the correct gauge wire recommended by the manufacturer.
- Corrosion: Corrosion is another common culprit when it comes to starter button wiring issues. Over time, moisture and other contaminants can cause corrosion to build up on the connections, inhibiting the flow of electricity. Regularly inspecting and cleaning the connections can help prevent this issue.
- Faulty starter button: Lastly, the starter button itself may be faulty. If none of the above troubleshooting steps resolve the issue, it may be necessary to replace the starter button with a new one.
Steps To Troubleshoot And Fix Problems
Now that we’ve identified some common wiring issues, let’s look at the steps you can take to troubleshoot and fix them:
- Inspect the connections: Start by visually inspecting all the wiring connections, ensuring that they are secure and free from any damage or corrosion.
- Tighten loose connections: If you find any loose connections, tighten them using a wrench or screwdriver, depending on the type of connection.
- Check the wire gauge: Verify that you are using the correct gauge wire for your starter button. Consult the manufacturer’s instructions or consult a professional if you’re unsure.
- Replace damaged wires: If you identify any damaged or worn-out wires, replace them with new ones of the appropriate gauge.
- Clean the connections: If you notice any corrosion on the connections, clean them using a wire brush or electrical contact cleaner.
- Test the starter button: Once you have completed the above steps, test the starter button to ensure that it is working properly. If it still doesn’t work, consider replacing the button.
By following these troubleshooting steps, you should be able to identify and fix any wiring issues with your starter button. Remember to always consult the manufacturer’s instructions and, when in doubt, seek the assistance of a professional.

Credit: ls1tech.com
Importance Of Regular Maintenance
Regular maintenance is essential for keeping your starter button in good working condition. When determining the gauge wire for your starter button, it is recommended to consult reliable sources or seek professional advice to ensure the proper wire size is used for optimal performance and safety.
Gauge Wire for Starter Button
Regular maintenance is essential for ensuring the longevity and optimal functionality of your starter button system. Neglecting maintenance can lead to various issues, including poor performance and potential safety hazards. By conducting routine checks and addressing any necessary repairs or replacements, you can avoid these problems and maintain the efficiency of your starter button system.
Checking And Cleaning Connections:
- Inspect all connections associated with the starter button system, including wires, terminals, and connectors.
- Look for any signs of corrosion, loose connections, or frayed wires.
- Ensure that all connections are secure and tight.
- Clean any dirty or corroded connections using an electrical contact cleaner.
- Tighten any loose connections to guarantee proper electrical continuity.
Inspecting Wire For Wear Or Damage:
- Carefully examine the wires in your starter button system for any signs of wear, damage, or insulation deterioration.
- Look for exposed wires, frayed ends, or cuts in the insulation.
- Check for any signs of overheating, such as discoloration or melted insulation.
- Ensure that the wire gauge is appropriate for the electrical load and recommended by the manufacturer.
- Replace any worn-out or damaged wires promptly to prevent electrical malfunctions or hazards.
Replacing Worn Out Wires:
- Determine the appropriate gauge wire for your specific starter button system and follow the manufacturer’s recommendations.
- Disconnect the power source before replacing any wires.
- Use wire strippers to remove the insulation from the new wire and make clean cuts.
- Match the gauge and color of the new wire with the old wire for a seamless replacement.
- Connect the new wire securely to the existing connections using crimp connectors or soldering, ensuring proper electrical contact.
Regular maintenance of your starter button system is crucial for optimal performance and safety. By regularly checking and cleaning connections, inspecting wires for wear or damage, and replacing worn-out wires, you can ensure a reliable and efficient starter button system that will last for years to come.
Don’t overlook the importance of these maintenance tasks to avoid unnecessary issues and potential safety risks.
Faq Gauge Wire for Starter Button
The appropriate gauge wire for a starter button varies depending on the specific vehicle and its electrical requirements. It is recommended to consult a professional or refer to the vehicle’s manual for the correct wire gauge to ensure safe and efficient operation.
Can I Use A Thinner Wire Gauge For A Starter Button?
- It is not recommended to use a thinner wire gauge for a starter button.
- The starter button requires a specific amount of electrical current to function properly.
- Using a thinner wire gauge can result in an inadequate power supply, leading to a malfunctioning starter button.
What Are The Consequences Of Using The Wrong Wire Gauge?
- Using the wrong wire gauge can have several consequences.
- If the wire gauge is too thin, it can result in overheating and potentially cause a fire hazard.
- If the wire gauge is too thick, it can lead to inefficient power transfer and unnecessary strain on the electrical system.
Is It Necessary To Use A Relay With A Starter Button?
- Using a relay with a starter button is highly recommended.
- A relay acts as a switch, enabling the starter button to control a higher current flow without directly passing through the button itself.
- This helps protect the starter button and ensures a safer and more efficient electrical system.
Can I Use Automotive Wire For My Starter Button?
- Yes, you can use automotive wire for your starter button.
- Automotive wire is specifically designed to handle the electrical demands of vehicles.
- It is important, however, to use the appropriate wire gauge and ensure the wire is rated for the necessary current flow.
Can I Use A Thicker Wire Gauge Than Recommended?
- It is generally not recommended to use a thicker wire gauge than what is recommended.
- Using a thicker wire gauge can lead to unnecessary costs and may not provide any additional benefits.
- It is best to adhere to the manufacturer’s recommendations for wire gauges to ensure optimal performance and safety.
How Do I Choose The Right Crimp Connectors For My Wire Gauge?
- Choosing the right crimp connectors for your wire gauge is essential for a secure and reliable electrical connection.
- Begin by determining the gauge of your wire. This information is typically printed on the wire insulation.
- Match the wire gauge to the appropriate crimp connector size. This is usually indicated on the packaging or product specifications.
- It is important to use the correct crimping tool to ensure a proper connection. Follow the manufacturer’s instructions for crimping the connector onto the wire.
Frequently Asked Questions Of What Gauge Wire For Starter Button?
What Size Wire For A Starter Button?
The recommended wire size for a starter button is gauge 12 or 14.
What Gauge Wire Is Needed For Starter Solenoid?
The gauge wire needed for a starter solenoid is typically 12-14 gauge.
What Gauge Wire For 12 Volt Starter?
For a 12-volt starter, a gauge wire size of 12 or 14 is recommended.
What Wire Goes From Ignition To Starter?
The wire that goes from the ignition to the starter is usually a thick red wire. Other wire colors may vary.
What Gauge Wire Should I Use For A Starter Button?
Use a 12-14 gauge wire for a reliable and safe connection to your starter button.
Conclusion: Gauge Wire for Starter Button
To ensure the proper functioning of your starter button, it is crucial to use the correct gauge wire. The gauge wire you need for your starter button will depend on various factors such as the power requirements of your vehicle and the distance between the starter button and the starter itself.
It is generally recommended to use a 12-14 gauge wire for the starter button. This wire size will ensure that there is proper electrical conductivity and minimal voltage drop, allowing the starter button to function efficiently. Using a wire that is too thin may lead to overheating and potential damage to your vehicle’s electrical system.
On the other hand, using a wire that is too thick might be unnecessary and can increase the cost of your wiring project. Therefore, it is essential to consult the manufacturer’s instructions or seek professional advice to determine the appropriate wire gauge for your specific starter button setup.
Remember, using the right wire gauge is essential for the reliable and safe operation of your starter button.